
14 Apr SONRA WATCH – PACEMAKER
Sonra Watch is one of the most powerful on field tools for a sports scientist or coach working with a group(s) for conditioning, rehab and/or Return to Play (RTP) athletes.
Sonra Watch allows a user to connect up to 8 players at once, collecting 28 metrics for each player.
Now Sonra Watch updates introduces Pacemaker, another vital feature for on field conditioning.
Depending on the aim, users can manipulate workout variables in order to achieve the desired physiological response for their athletes during that workout or session.
There are a number of variables in which can be manipulated in order to alter the physiological response [1].
The key variables include work bout intensity (through speed or pace), work duration & rest durations along number of reps, sets and time between sets.
Sonra Watch’s Pacemaker feature allows users to pre-set and modify their workout variables for various types of workouts via Steady State and Intervals modes.
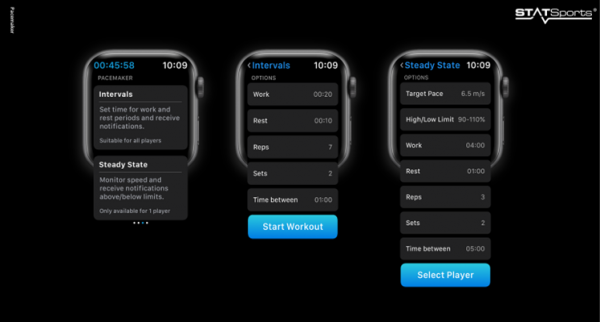
Figure 1. Pacemakers customisable workout options for Intervals & Steady State modes.
Steady State
Pacemaker’s Steady State mode allows a user to monitor the speed of a custom steady state workout for a single athlete.
When the athlete deviates from the set speed (above or below the custom limits) they will receive haptic & visual feedback from Sonra Watch, alerting them to alter their speed and ensure they perform the exercise at the desired pace.
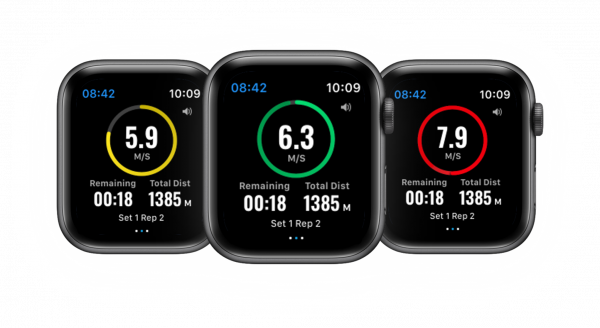
Figure 2. Steady State Active Screens where pace is below (yellow), above (red) and on pace (green).
Steady State’s active screen provides real time insights of the workout and current rep.
The athlete’s current speed, at that exact moment, is displayed in the centre of the screen which is bordered by a coloured circle, yellow, green or red.
The colour represents whether the athlete is on pace (green), below the low limit (yellow) or above the high limit (red).
A full circle represents 100% of the target speed.
The above image shows an example of a target speed of 6.5m/s (6.3 m/s current speed as Green = 97% target speed).
Total Distance displayed on the active screen is the distance covered during all work periods of the steady state workout and will exclude any distance accumulated during rest periods or prior to the workout (i.e. warm up, etc.).
This distance value will likely be different to the Total Distance value shown in the workout summary screen, which shows all the metrics accumulated from the start of the entire session until the end of the current workout.
Time remaining beside the Total Distance will countdown the time remaining of the current rep.
The total time accumulated of the workout will be shown at the top left of the screen in blue. This includes time during rest periods also.
The current rep and current set will also be displayed at the bottom of the screen during work periods, but during rest periods the next rep will be displayed to prepare the athlete for what is next.
As the athlete is wearing the watch and working during the active periods of the workouts, only this screen and the settings screen are available for access.
The settings screen allows the user to change their set pace, stop or pause the workout or water lock the screen.
However, during rest periods the user can access all the metric data as normal in the app.

Figure 3. Access during Steady State workouts during active and rest periods.
During the rest periods the user can navigate through the app as normal and view any of the 28 available metrics, set or adjust session thresholds or change the on display carousel metric for an instant glance view of the main metric of interest during the drill or session.
When there are 5 seconds remaining of the rest period the app will automatically direct the user back to the rest screen of the workout before the next rep begins.
High & Low Limits
Steady State mode is designed to ensure that the athlete completes the exercise at the desired pace, and with the independently dynamic high & low limits, this allows for users to be flexible in how they define their desired pace.
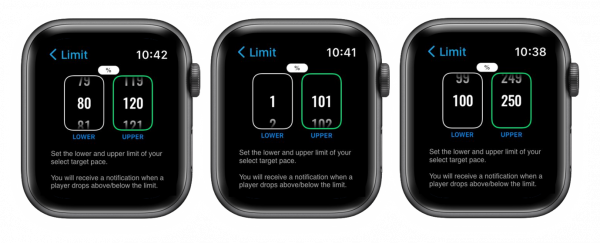
Figure 4. Steady State’s customisable High and Low limits.
The high and low limits for Steady State can be set separately from each other meaning that the low limit can be set as low as 1% of Target Speed and the high limit can be set as low 101%.
An example use case of this could be an athlete rehabbing a hamstring injury where the aim is to not exceed a certain speed during a session.
The athlete will be notified to decrease their speed when they exceed 101% of the Target Speed and will be considered on pace when they stay between 1% – 101% of Target Speed.
An alternative use case could be where the low limit is set at 100% (max low limit) and the high limit is set at 250% (max high limit) to ensure that all work completed is above the Target Speed.
This could help ensure HSR exposure or to complete time above MAS.
Real Time & Post Workout Feedback
The customisable high and low limits are used to determine whether the user is on pace, and when they exceed or drop below the limits they are notified instantly via haptic feedback.
If a user exceeds the high limit they will receive Apple’s ‘up’ haptic to alert them that they have surpassed their high limit.
If the user continues above this limit the will receive the haptic again every 5 seconds until they return to the desired pace.
If the user drops below the low limit, they will receive Apple’s ‘down’ haptic to signify they have fallen below the desired pace.
If they remain below, they will receive the haptic every 5 seconds they stay below until they return to the desired pace.
The haptic feedback allows the user to focus on the rep at hand while Pacemaker ensures they stay within the desired limits to achieve the aim of the workout.
After the workout, users are provided with an insightful summary of how they performed during the workout through time above, below and on pace along with the % breakdown of time spent in each (during work periods only).
Steady State’s summary also displays a time series speed graph coloured to show when the user was above, below or on pace.
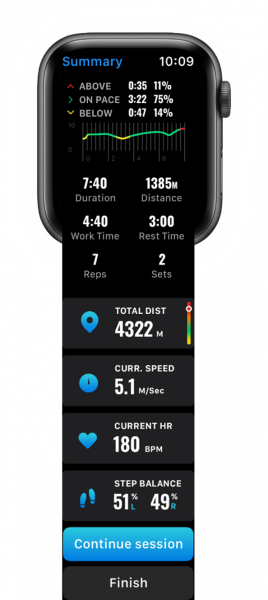
Figure 5. Steady State Summary Screen.
Following a Steady State workout, the user can choose to either finish the session or continue the current session.
The summary also shows the load accumulated in the entire session until the end of the Steady State workout across all 28 metrics.
This can help users in their decision making for the rest of the session.
Intervals
Pacemaker’s Intervals mode allows a user to predetermine work & rest times, that can be used for all types of interval training.
Coaches can input their desired workout options through custom work and rest periods and number reps and sets.
Intervals provides global times which can be applied to single or multiple players.
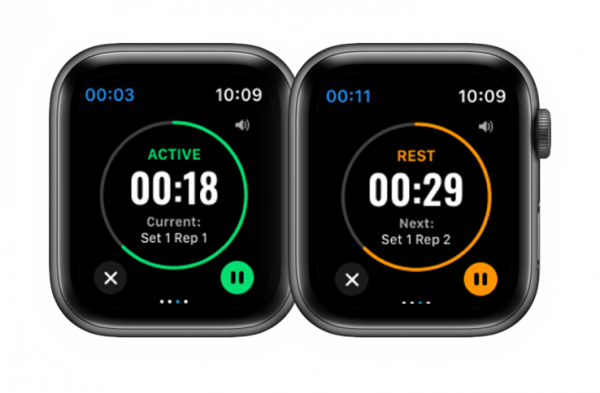
Figure 6. Intervals Mode Active and Rest Screens.
Intervals mode acts as a smart stopwatch that prompts the coach when to cue for work & rest periods and provides a 5 second warning of when a rep is about to begin via audio feedback.
This allows the coach to focus on their athletes and task at hand, while Pacemaker manages timings.
As well as audio, haptic feedback is also provided to the user wearing the watch who is notified by a distinctive vibration & chime when a work or rest period has begun.
Active/ Rest Screens
The active/ rest screen provides a countdown timer based on the time input for the work or rest duration.
The green circle around the timer on the active screen also provides a visual representation of the time remaining/ completed.
This begins as an empty circle and fills up in a clockwise direction until the circle is completely green.
The rest screen runs in the opposite direction where the circle starts full orange and empties in an anticlockwise direction to signify rest period has ended.
Within these screens, the user has the ability to disable/ enable audio cues by selecting the speaker icon at the top right of the screen.
The current workout can also be paused via the pause button on the bottom right (stopping all time metrics, all metric data is still recorded) or stop the workout, via the stop button on the bottom left.
Finishing the workout set out, or prematurely, provides users with a summary of the work that was completed with total, work and rest times and number of reps and sets completed.
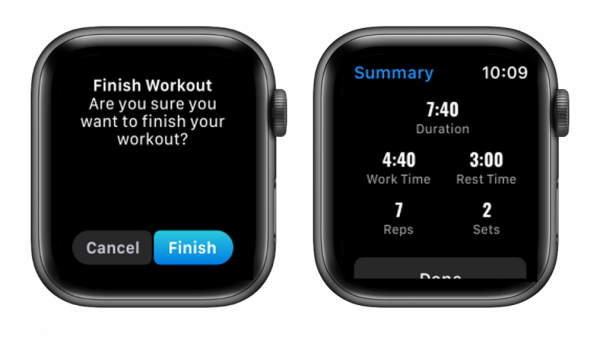
Figure 7. Intervals mode finishing a workout and Summary Screen.
During Interval workouts the coach can still access all the data for up to 8 players, during both active and rest periods.
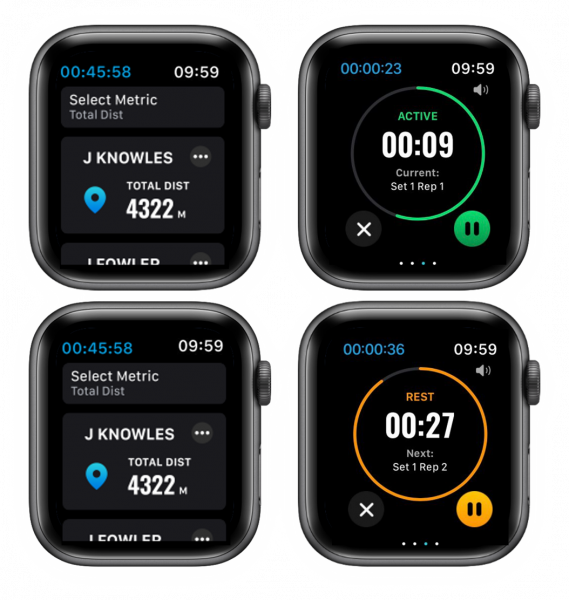
Figure 8. Intervals mode access during a workout.
Haptic & Audio Feedback
Whilst navigating through the app, users will still receive haptic and audio feedback to alert them on the status of their work and rest periods.
User will receive a single vibration and chime for the start of a work period along with an audio cue saying ‘work’.
To signify the start of a rest period, users will receive a double vibration and chime, along with an audio cue saying ‘rest’.
When there is 5 seconds left of a rest period, users will also receive a audio cue saying ‘5 seconds’ as a warning that a rep is about to begin.
At the halfway point of a rep the users will be prompted that they are halfway through the rep without the need to have to check the time on the watch.
For Best Experience
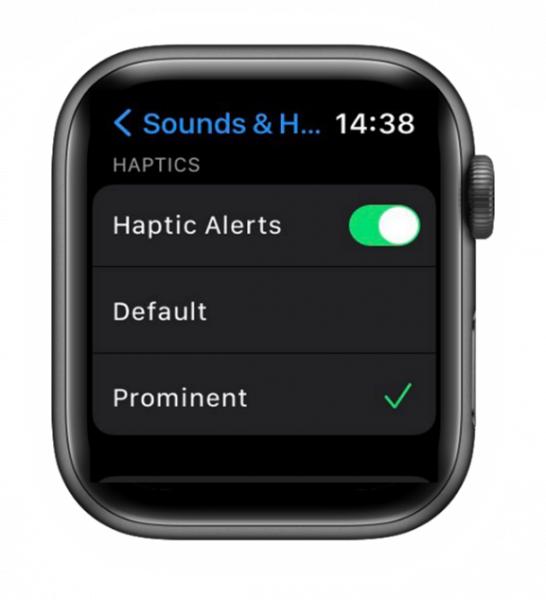
Ensure Audio is enabled for Audio Cues and ensure haptics are set to prominent for best use on field.
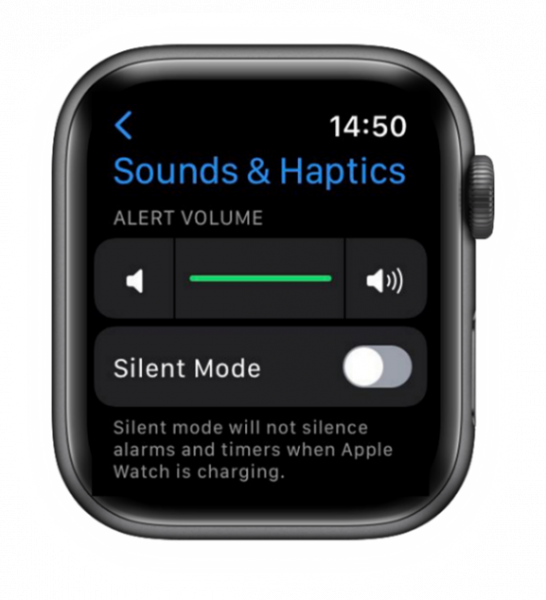
Volume & Sounds
On your Apple Watch, open the Settings app.
- Scroll down, then tap Sounds & Haptics.
- Tap the volume up button to increase it. You can also tap the slider, then turn the Digital Crown.
Haptic Alerts
- Open the Settings app.
- Scroll down and tap Sounds & Haptics.
- Turn Haptic Alerts on.
- To add extra emphasis to haptic alerts, tap Prominent. This feature adds an additional haptic tap that pre-announces some of your other haptic alerts.
You can also change the settings for specific apps from your iPhone.
On your iPhone, open the Apple Watch app, go to the My Watch tab, and tap Sounds & Haptics.
If you’re wearing your Apple Watch and you don’t feel a tap as you adjust the slider, contact Apple Support.
For the best haptic results, the back of your Apple Watch needs skin contact. Use a snug, but comfortable fit.
Link here: Change the audio and notification settings on your Apple Watch.
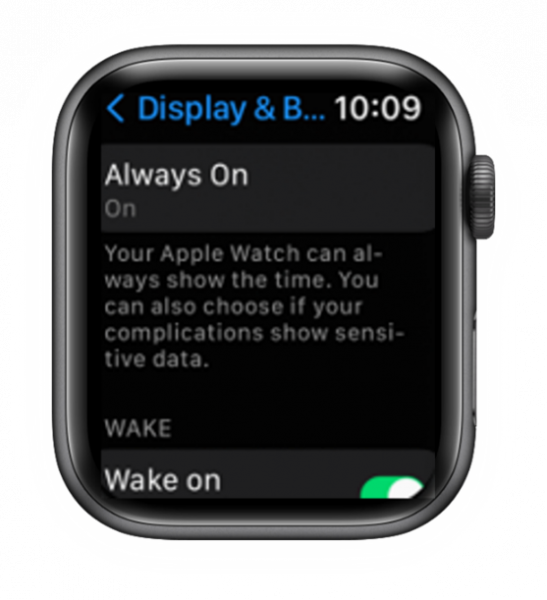
Always On (Apple Watch Series 5, Apple Watch Series 6, and later only)
Always On lets Apple Watch display the watch face and time, even when your wrist is down. When you raise your wrist, Apple Watch functions fully.
- Open the Settings app on your Apple Watch.
- Tap Display & Brightness, then tap Always On.
- Turn on Always On, then tap the following options to configure them:
- Show Complication Data: Enable Sonra Watch
- Show Notifications: Enable Sonra Watch.
- Show Apps: Enable Sonra Watch.
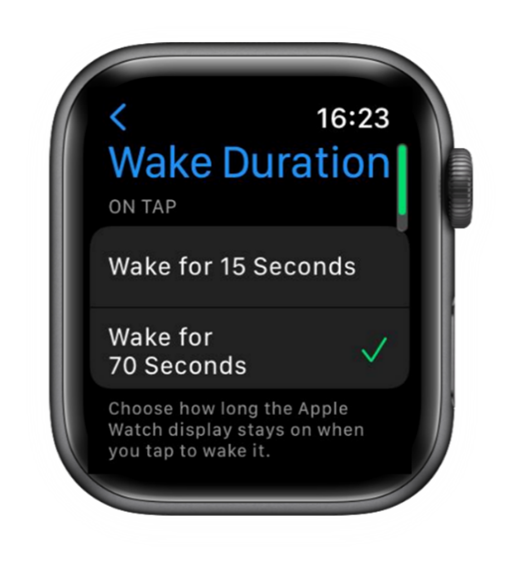
Keep the Apple Watch display on longer
You can keep the display on longer when you tap to wake your Apple Watch.
- Open the Settings app on your Apple Watch.
- Tap Display & Brightness, tap Wake Duration, then tap Wake for 70 Seconds.
For more information on these updates, please contact your Account Manager or get in touch.
References
- Laursen, P., & Buchheit, M. (2019). Science and application of high-intensity interval training. Human Kinetics. https://hiitscience.com/book/